Assembling an Orbeez gun can be an exciting and engaging experience for both kids and adults alike. These colorful, squishy water beads create a unique sensory play experience, and an Orbeez gun adds an element of fun to the mix.
While the assembly process may vary slightly depending on the specific model or brand of the Orbeez gun you have, this general guide will provide you with a good starting point to put your Orbeez gun together.
By following a few simple steps, you’ll soon have your Orbeez gun ready to go, allowing you to shoot vibrant Orbeez beads and enjoy hours of imaginative play.
So, let’s dive in and discover how to assemble your Orbeez gun and create a world of playful excitement!
Contents
How to Assemble an Orbeez Gun: Step-by-Step Guide (General Instructions)
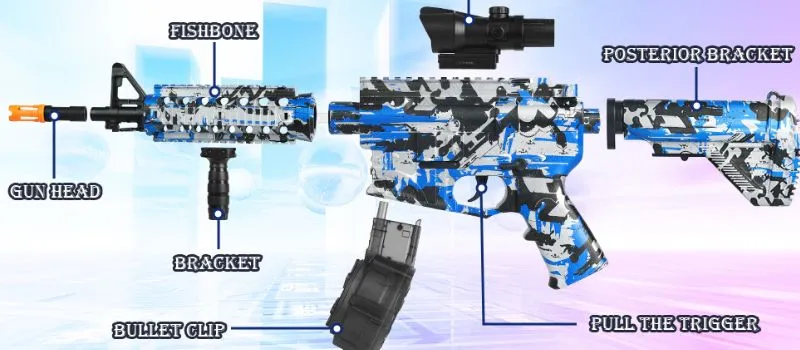
Step 1: Unbox and Gather Components Remove the Orbeez gun from its packaging and ensure you have all the necessary components. This may include the main body of the gun, a barrel, a plunger, a trigger mechanism, and any additional accessories or attachments.
Step 2: Identify Parts and Connect the Barrel Take a look at the components and familiarize yourself with their functions. Locate the barrel, which is typically a detachable part. Align the barrel with the front end of the gun and firmly push it in until it locks into place. It should fit snugly and securely.
Step 3: Attach the Plunger Find the plunger, which is usually a movable part located at the rear of the gun. Insert the plunger into the designated slot or chamber at the back of the gun. It should slide in smoothly, and you may need to apply gentle pressure to ensure it is fully inserted.
Step 4: Connect the Trigger Mechanism Next, locate the trigger mechanism, which is responsible for activating the Orbeez shooting action. Attach the trigger mechanism to the designated area on the gun’s handle or grip. Align the slots or connectors and push the trigger mechanism into place until it locks securely.
Step 5: Check Connections and Test Functionality Before proceeding, ensure that all the components are properly connected and secured. Give each part a gentle tug to confirm they are firmly in place. Once you’re confident in the assembly, test the functionality of the Orbeez gun by pulling the trigger. It should smoothly activate the plunger, pushing Orbeez beads through the barrel.
Step 6: Add Batteries (If Required) If your Orbeez gun operates on batteries, this is the time to install them. Refer to the specific instructions provided by the manufacturer to identify the battery compartment and its requirements. Open the compartment, insert the batteries according to the correct polarity (+/-), and close the compartment securely.
Step 7: Fill with Orbeez Now that your Orbeez gun is assembled and ready, it’s time to add the colorful Orbeez beads. Follow the manufacturer’s instructions on how to prepare the Orbeez, whether it involves soaking them in water for a specific amount of time or using pre-filled packets. Once your Orbeez are ready, fill the gun’s barrel with the beads, taking care not to overfill.
Step 8: Start Shooting! With your Orbeez gun fully assembled and loaded, you’re now ready to enjoy the fun of shooting Orbeez beads. Aim carefully and pull the trigger to launch the squishy orbs towards your target or into the air. Remember to have fun and play responsibly while enjoying your Orbeez gun.
Note: These instructions are general guidelines and may not cover all the specific details of every Orbeez gun model. Always consult the manufacturer’s instructions or any provided manuals for precise assembly instructions related to your specific Orbeez gun.
St
How to Put the Battery in an Orbeez Gun: Step-by-Step Guide:
Please note that not all Orbeez guns require batteries. If your Orbeez gun model does not use batteries, you can skip this step.
Step 1: Identify the Battery Compartment Examine your Orbeez gun to locate the battery compartment. It is usually located in the handle or grip area of the gun. Refer to the manufacturer’s instructions or any provided manuals for specific guidance on the battery compartment’s location.
Step 2: Prepare the Batteries Check the manufacturer’s instructions to determine the type and quantity of batteries required for your Orbeez gun. Make sure you have the correct type and number of batteries on hand. It is always recommended to use fresh, fully charged batteries for optimal performance.
Step 3: Open the Battery Compartment Depending on the design of the Orbeez gun, the battery compartment may have a cover or a sliding panel. Look for any release buttons, switches, or markings indicating how to access the compartment. Follow the instructions provided to open the battery compartment.
Step 4: Insert the Batteries Correctly Take note of the battery polarity indicated inside the battery compartment. Typically, there will be markings (+/-) or symbols indicating the correct orientation for the batteries. Align the positive (+) and negative (-) ends of the batteries with the corresponding markings or symbols inside the compartment.
Step 5: Insert the Batteries Carefully insert the batteries into the battery compartment one at a time, ensuring they fit snugly. Pay attention to the correct orientation and polarity to avoid any damage or malfunction.
Step 6: Close the Battery Compartment Once the batteries are properly inserted, close the battery compartment securely. Ensure that any locks, latches, or fasteners are engaged to keep the compartment tightly closed.
Step 7: Test the Orbeez Gun With the batteries installed, you can now test the functionality of your Orbeez gun. Follow the manufacturer’s instructions on how to operate the gun and ensure that the battery-powered features, if any, are working correctly.
Conclusion
By following the general steps outlined in this guide, you’ll be able to put your Orbeez gun together, load it with colorful Orbeez beads, and enjoy shooting them with a pull of the trigger. Remember to consult the specific instructions provided by the manufacturer for your particular Orbeez gun model.